Showing posts with label table. Show all posts

February 21, 2016

Internal tables in ABAP Part 2

In the last post we showed what are internal tables, how many types are and how they are accessed. These data structures are habitually used to handle data in a program and without these it wouldn't be possible to manage information from transparent tables and even internal structures.

However it's necessary to know when to use these types, for example; the standard tables are the only data structure that can be used in ALV grids but they also are not adviced for performance in a large amount of information.

The access on STANDARD tables are sequential, so the search will be linear in relation with its size. On the other hand, you can make use of the SORT command and then search in the table with BINARY SEARCH. Another way could be using the INDEX which is a very fast key access.

Depending on the size of the table the search can be very fast but with so many tuples the performance can be affected.

If you want to gain the most on performance in big tables it is recommended to use SORTED and/or HASHED tables. In both you must define a key but in the SORTED one you can create a NON-UNIQUE KEY.

The key access in SORTED table is logarithmical, that means that the performance is affected very little when reading large amount of data.

HASHED tables use a hash algorithm promising a constant access time to find a tuple.

Have in mind that all the internal tables work on memory and that they have limits and if you don't manage them appropiately you could end up with a short dump because of memory resources.

The key here is efficiency, how could you bring the most of the internal tables? Making a good choice when dealing with these structures. For example


November 17, 2015

Internal tables in ABAP. Part 1

There are two kinds of tables in SAP, these are:
  • Transparent tables
  • Internal tables
Transparent tables are the database tables and they are referenced by the same name. The content of these tables are accessed by OPEN SQL which is a convention defined by SAP to map the data from these tables. These tables are created and modified in transaction 'SE11'.

Internal tables are data repositories that can have a defined structure and reside in the session memory. The structure of these tables can be one defined by our own structure, a transparent table structure or the combination of both. These can be created or defined in 'SE11' and/or as part of the source code of a program. 

Most of the time in ABAP we are going to face the use of the latter when handling large amount of data that could finally be stored in a database or especifically in transparent tables. To access the rows of the internal tables we use special structures known as work areas and field symbols. We will cover more on field symbols in next posts.

There are 3 types of internal tables:
  1. Standard tables
  2. Sorted tables
  3. Hashed tables
  4. Any tables
  5. Index tables

Standard tables

Characteristics:
  • Is the most basic table structure and is used by the majority of (if not all) the function modules and everywhere in ABAP.
  • You can address data using an index and it is also possible to make a binary search which is logarithmically proportional to size of the table.
  • In order to make use a binary search it's necessary to sort the table first with key field.
  • No restrictions on duplicated keys.
  • Use APPEND to add rows to the table.
Example:

 1
 2
 3
 4
 5
 6
 7
 8
 9
10
11
12
13
14
15
16
17
18
19
20
21
22
DATA: it_data TYPE STANDARD TABLE OF ty_data, " It can also be defined as 'it_data TYPE TABLE OF ty_data' without the word 'STANDARD'
   wa_data TYPE ty_data. " Or alternatively: DATA wa_data LIKE LINE OF it_data.

DO 100 TIMES.
 wa_data-field1 = sy-tabix.
 CONCATENATE 'Data' sy-tabix INTO wa_data-field2.
 GET TIME FIELD wa_data-time.
 APPEND wa_data TO it_data.
ENDDO.

READ TABLE it_data INTO WA_DATA WITH KEY field1 = 50.

IF SY-SUBRC EQ 0.
 WRITE: / 'Read table using field: ',  wa_data.
ENDIF.

SORT it_data BY field1.
READ TABLE it_data INTO WA_DATA index 10.

IF SY-SUBRC EQ 0.
 WRITE: / 'Read using index: ', wa_data.
ENDIF.


Sorted table

Characteristics:
  • A key must be defined.
  • Can be sorted or non-sorted by specified key[s].
  • Always in ascending order.
  • It can't be used 'BINARY SEARCH', however internally it uses binary search. The search is logarithmically proportional to size of the table.
  • Can't be used the command 'SORT' on them.
  • Use INSERT <work area> INTO <sorted table> to add rows to the table. The new rows will internally be added according the key defined.
Example:

 1
 2
 3
 4
 5
 6
 7
 8
 9
10
11
12
13
14
15
DATA: it_sorted TYPE SORTED TABLE OF ty_data WITH UNIQUE KEY field1,
      it_non_sorted TYPE SORTED TABLE OF ty_data WITH NON-UNIQUE KEY field1.

DO 100 TIMES.
 wa_data-field1 = 100 - sy-tabix. " Number in descendent order
 CONCATENATE 'Data' sy-tabix INTO wa_data-field2.
 GET TIME FIELD wa_data-time.
 INSERT wa_data INTO it_data.
ENDDO.

READ TABLE it_data INTO WA_DATA WITH KEY field1 = 50.

IF SY-SUBRC EQ 0.
 WRITE: / 'Read using key field',  wa_data.
ENDIF.


Hashed table
  • Managed by a hash algorithm.
  • A key must be defined.
  • Main operation is key access.
  • Access time is constant.
  • It is recommended to use with big datasets.
  • Can't be used index to access data.
  • Use INSERT to add rows to the table.
Example:

 1
 2
 3
 4
 5
 6
 7
 8
 9
10
11
12
13
14
DATA it_hashed TYPE HASHED TABLE OF ty_data WITH UNIQUE KEY field1 field2.

DO 100 TIMES.
 wa_data-field1 = 100 - sy-tabix. " Number in descendant order
 CONCATENATE 'Data' sy-tabix INTO wa_data-field2.
 GET TIME FIELD wa_data-time.
 INSERT wa_data TO it_data.
ENDDO.

READ TABLE it_data INTO WA_DATA WITH KEY field1 = 50.

IF SY-SUBRC EQ 0.
 WRITE: / 'Read using key field',   wa_data.
ENDIF.


Index and Any table

These are generic tables and we are going to show their use in next posts. However they are defined like this.

1
2
3
FIELD-SYMBOLS <it_index> TYPE INDEX TABLE.

FIELD-SYMBOLS <it_any> TYPE ANY TABLE.

See you in the next.

Hope it helps.

November 10, 2015

Clear, refresh and free in ABAP

In contrast to other languages where we need to make use of its basic value to initialize the variables, in SAP we don't have to make such thing. Besides initialize or clear a variable with its basic value like integers to zero and strings to space(s), in SAP we can make use of the command 'CLEAR' that can also be used with any variable and structure. For example:

 1
 2
 3
 4
 5
 6
 7
 8
 9
10
DATA: lv_number TYPE n, lv_char type c.
lv_number = 1.
WRITE lv_number.
CLEAR lv_number. " Initialize to 0
WRITE lv_number.

lv_char = 'A'.
WRITE lv_char.
CLEAR lv_char. " Initialize to space[s]
WRITE lv_char.

The same applies to work areas;

 1
 2
 3
 4
 5
 6
 7
 8
 9
10
11
12
13
14
15
16
TYPES: BEGIN OF ty_data,
  matnr TYPE matnr,
  value(2) TYPE n,
  erdat TYPE erdat,
END OF ty_data.

DATA wa_data TYPE ty_data.
wa_data-matnr = '1'.
wa_data-value = '01'.
wa_data-erdat = sy-datum.

WRITE: 'Work area with data', wa_data.

CLEAR wa_data. " All members initialized

WRITE: / 'Work area cleared', wa_data.

The output is the following:

The effect on the content of field symbols is the same as work areas.

For internal tables we also have the option to use the CLEAR command and 2 options more: REFRESH and FREE. Let's show how they work with an example:

 1
 2
 3
 4
 5
 6
 7
 8
 9
10
11
12
13
14
15
16
17
18
19
20
21
22
TYPES: BEGIN OF ty_data,
  matnr TYPE matnr,
  value(5) TYPE n,
  erdat TYPE erdat,
END OF ty_data.

DATA: it_data TYPE STANDARD TABLE OF ty_data,
wa_data LIKE LINE OF it_data,
lv_count type i.

DO 10 TIMES.
  wa_data-matnr = sy-index.
  wa_data-value = '01'.
  wa_data-erdat = sy-datum.
  APPEND wa_data TO it_data.
ENDDO.

DESCRIBE TABLE it_data LINES lv_count. " Variable lv_count has the value 10

CLEAR it_data[]. " This will initialize all the content of table including the table header
REFRESH it_data. " This will initialize all the content of table but not the table header
FREE it_data. " This will initialize all the content of table including the table header and will release from memory the table

CLEAR <itab>[]: Will initialize all the content of table including the table header. Check out the brackets.

REFRESH <itab>: Will initialize all the content of table but not the table header. **

FREE <itab>: Will initialize all the content of table including the table header and will release the table from memory.

** What is the table header? Well, when a table is defined like this:

1
DATA it_data TYPE STANDARD TABLE OF ty_data WITH HEADER LINE.

It means that you can use a work area defined within the table so you don't need to create a work area for this. However, it is not advisable, it's better to use work areas and field symbols. So please, don't take this as a regular practice, just have in mind that a lot of legacy code still has this type of declaration.

Example:

 1
 2
 3
 4
 5
 6
 7
 8
 9
10
11
12
13
DATA: it_data TYPE STANDARD TABLE OF ty_data WITH HEADER LINE,
      lv_count type i.

DO 10 TIMES.
  it_data-matnr = sy-index.
  it_data-value = '01'.
  it_data-erdat = sy-datum.
  APPEND it_data.
ENDDO.

REFRESH it_data. " The work area within IT_DATA still has data.

WRITE it_data. " This will output of the work area'               10 0000120151110'

Well, that's all for this now.

See you in the next.

Hope it helps.

April 10, 2015

Unlocking SM30 in ABAP

Hi, I'm going to show how to unlock transaction SM30 when using to admin data.

By default, SAP locks the entire table when a user edits a single entry which is annoying when several users try to use it.


To avoid this behaviour we must unlock the table to let others to add, update and delete data. 

Check this link for a more complete example.

Ok, let's code ABAP:

1. First of all create a table.

2. Goto Utilities/Table Maintenance Generator.

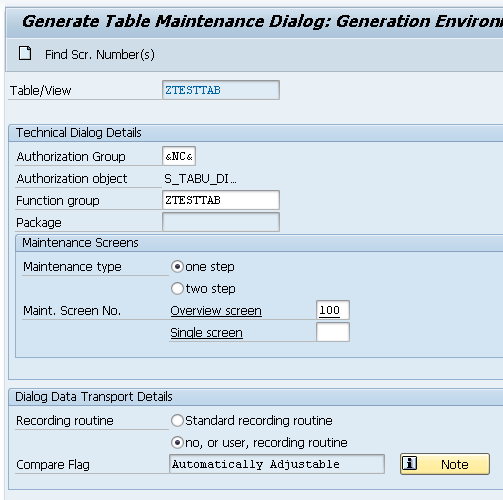
3. Set in Authorization Group the value '&NC&'.

4. In the 'Maintenance Screens' section select 'two step' and set as 'Overview screen' the value '100' and for 'Single screen' the value '101'.


5. Double click on screen '100'. You'll see a warning message but click on the ok button.


6. In PBO type 'MODULE unlock_table' like this:

1
2
3
4
5
6
7
process before output.
 module unlock_table. " ---------------------> Type this code
 module liste_initialisieren.
 loop at extract with control
  tctrl_ztesttab cursor nextline.
   module liste_show_liste.
 endloop.

7. Double click the word 'unlock_table' and add the following code. Send as a parameter your table name:

1
2
3
MODULE UNLOCK_TABLE OUTPUT.
  perform unlock using 'ZTESTTAB'. " Use your table name as parameter
ENDMODULE.

8. In the same include copy and paste the code for the form 'unlock_table':

 1
 2
 3
 4
 5
 6
 7
 8
 9
10
11
12
13
14
15
16
17
18
19
20
21
22
23
24
25
26
27
28
29
30
31
32
33
34
35
36
37
38
39
40
form unlock using p_table.
  data begin of seltab occurs 1.
        include structure vimsellist.
  data end of seltab.

  data begin of excl_cua_funct occurs 1.
        include structure vimexclfun.
  data end of excl_cua_funct.

  data: it_enq_del  type standard table of seqg3,
        it_enq_read type standard table of seqg7,
        wa_enq_read type seqg7,
        wa_enq_del  type seqg3,
        lv_subrc    type sy-subrc.

  call function 'ENQUE_READ2' " Buscar todos los bloqueos
   exporting
     gclient = sy-mandt
     gname   = ' '
     guname  = '*'
   tables
     enq = it_enq_read.

* Buscar el bloqueo de la tabla que viene como parámetro
  loop at it_enq_read into wa_enq_read
    where gname eq 'RSTABLE'
      and garg  cs p_table.
    move-corresponding wa_enq_read to wa_enq_del.
    append wa_enq_del to it_enq_del.
  endloop.

* Eliminar bloqueo del objeto
  call function 'ENQUE_DELETE'
    exporting
      check_upd_requests = 1
    importing
      subrc              = lv_subrc
    tables
      enq                = it_enq_del.
endform.

Well, that's it, now you can make modifications on the table in different sessions at the same time.

Next time we will lock a single record to avoid anyone else modify the same row when other user is handling it.

See you on the next.

Hope it helps.

February 27, 2015

Table Maintenance options and ABAP

One of the traits I like about SAP is that you have several facilities to achieve more. One of those characteristics is in transaction ‘SE11’. This transaction is used to create tables and it comes with a feature where you can generate it’s own screen (dynpro) and basic validations, like, unique index and others.

This screen(s) can be modified with our own logic and validations and even the layout. You can add more detail as you wish. Maybe you could make this maintenance screen making a module pool in SE80 however the point here is that with transaction ‘SE11’ you don’t start from zero. This trait is very important because you can have a lot of features incorporated.

Let’s begin creating a table.

1. Execute transaction ‘SE11’ and name the table whatever you want but remember to use ‘Z’ or ‘Y’ as first letter.

2. Click on ‘Create’ button.

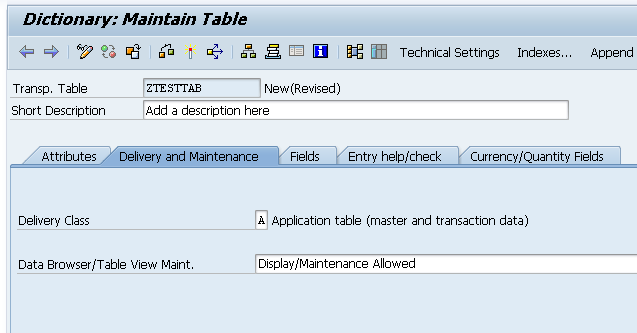
3. Add a description to table (This step is mandatory). Choose ‘A’ option for 'Delivery class' and ‘Display/Maintenance allowed‘ on the 'Delivery and maintenance’ tab. Check image.


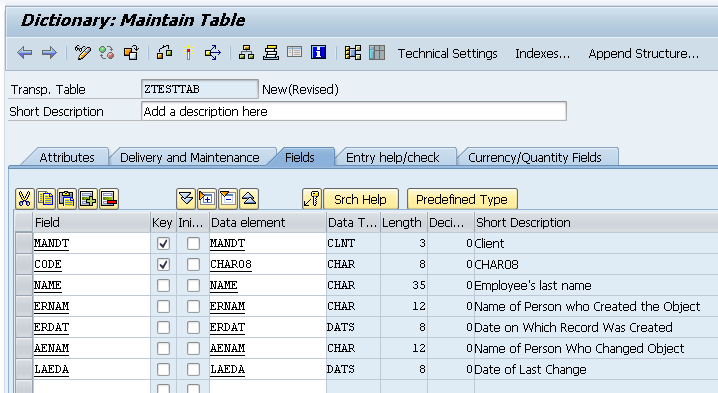
4. Select ‘Fields’ tab
  1. Add the following fields:
    1. Add as a first field ‘MANDT’ with type ‘MANDT’.
    2. Add field ‘CODE’ type CHAR08.
    3. Add field ‘NAME’ type STRING.
    4. Add field ERNAM type ERNAM
    5. Add field ‘ERDAT’ type ‘ERDAT’
    6. Add field ‘AENAM’ type ‘AENAM’
    7. Add field ‘LAEDA’ type ‘LAEDA’.


5. Setup the ‘Technical Settings’ where you will set 'Data class' will be 'APP0L' and 'Size Category '0'. Also check 'Log data changes' and 'Write access only with JAVA', these 2 options are optional. Here you'll be asked to save and a package before this screen, I suggest to click on 'Local object' button.


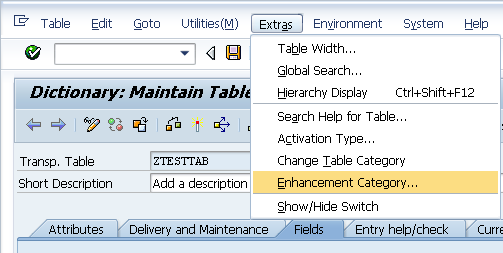
6. Choose the 'Enhancement Category' in Extras menu. Select 'Can be enhanced (character-type or numeric)' option.


7. Activate.


The next thing we should do is to generate the maintenance screen. The option we need here is in ‘Utilities’ menu where you select the ‘Table Maintenance Generator’ option. Here we have some things to configure;


First you need to indicate the authorization group, here it depends on what kind of restriction you would like this program to make, for this example type ‘&NC&’ which means ‘w/o auth. group’. The second thing to set is the function group, personally I would recommend to use the table name, however is up to you which name you set here.


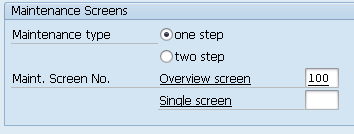
The third thing would be to set the screens of the block ‘Maintenance screens’. In this section you have two options:
  • One step
  • Two step
And the difference is that in the first option you make inserts and modifications in only one dynpro, here SAP sets you a grid to make all the actions on your data. The second option consists in specifying 2 dynpros; one for the grid and the second for issuing the data. The first dynpro shows you the data but in order to make inserts or changes you must make a double click to show you the data.

In our example select the first option (One step) and type '100' in the ‘Overview screen’.


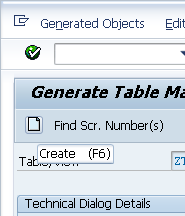
Now, click on 'Create' button or press 'F6'.


The next step is to make use of events. This option is found in the menu ‘Environment’/’Events’.


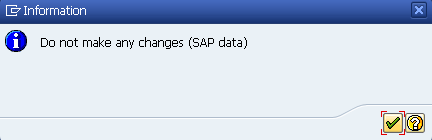
If you get the following message box click the 'Ok' button.


You will get through the following screen where you must choose what events are going to be raised.

01 Before saving the data in the database
02 After saving the data in the database
03 Before deleting the data displayed
04 After deleting the data displayed
05 Creating a new entry
06 After completely performing the function 'Get original'
07 Before correcting the contents of a selected field
08 After correcting the contents of a selected field
09 After getting the original of an entry
10 After creating the header entries for the change task (E071)
11 After changing a key entry for the change task (E071K)
12 After changing the key entries for the change task (E071K)
13 Exit editing (exit main function module)
14 After lock/unlock in the main function module
15 Before retrieving deleted entries
16 After retrieving deleted entries
17 Do not use. Before print: Event 26
18 After checking whether the data has changed
19 After initializing global variables, field symbols, etc.
20 after input in date subscreen (time-dep. tab./views)
21 Fill hidden fields
22 Go to long text maintenance for other languages
23 Before calling address maintenence screen
24 After restricting an entry (time-dep. tab./views)
25 Individual authorization checks
26 Before creating a list
27 After creation or copying a GUID (not a key field)
28 After entering a date restriction for time-dep. views
AA Instead of the standard data read routine
AB Instead of the standard database change routine
AC Instead of the standard 'Get original' routine
AD Instead of the standard RO field read routine
AE Instead of standard positioning coding
AF Instead of reading texts in other languages

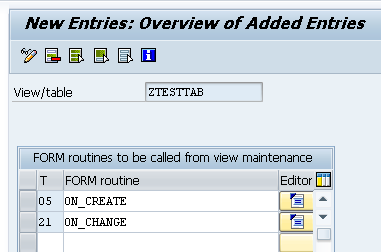
Just for example let’s use the events ‘05’ (Creating new entry) and ‘21’ (Fill hidden fields). Let’s say we want to put the user name and the date when the record is created and modified it.

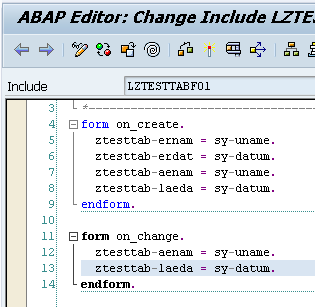
  1. Type event ‘05’ and on the ‘FORM Routine’ column type ‘on_create’.
  2. Type event ‘21’ and on the ‘FORM Routine’ column type ‘on_change’.


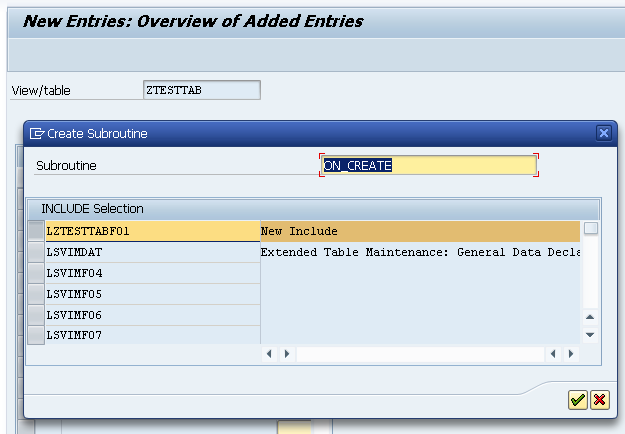
3. Next, click on column editor the button to type the code. You’ll be asked to make a PAI include. Click on button ‘OK’.


4. Paste the following code.


 1
 2
 3
 4
 5
 6
 7
 8
 9
10
11
form on_create.
  ztesttab-ernam = sy-uname.
  ztesttab-erdat = sy-datum.
  ztesttab-aenam = sy-uname.
  ztesttab-laeda = sy-datum.
endform.

form on_change.
  ztesttab-aenam = sy-uname.
  ztesttab-laeda = sy-datum.
endform.

5. Return to the event entries screen and click the save button and go back to the ‘Table Maintenance’ screen and also save the configuration.

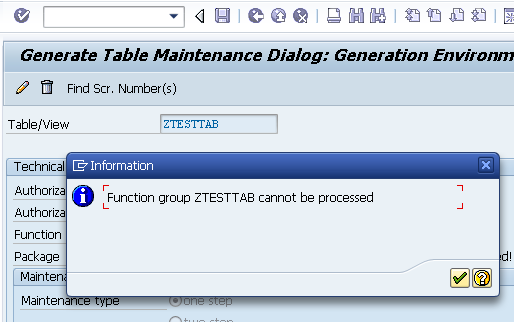
If you have the following message box ‘Function group ZTESTTAB cannot be processed’ then go to transaction ‘SE80’ and select the function group ‘ZTESTTAB’ and activate it but first change the ‘Change’ state of the table to ‘Display’. Check the images below.


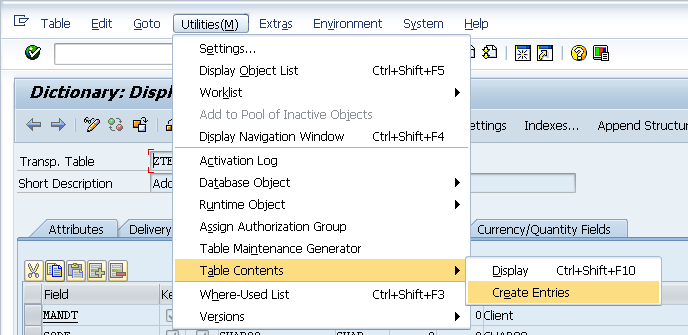
6. Create entries. Go to 'Utilities'/'Table contents'/'Create Entries' menu.


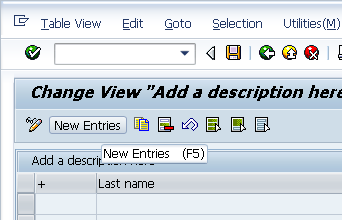
7. Finally click on button ‘New Entries’, fill the fields ‘+’ and ‘Last Name’ and press enter. And you’ll see that fields ‘Created by’, ‘Created On’, ‘Changed by’ and ‘Changed on’ now have the values we set in the ‘Creating a new entry’ event. The same will occur when you change it with another user.


One last comment is that in order to protect those fields from being modified you must edit the dynpro '100' you set in the 'Utilities'/'Table Maintenance Generator' menu and set the ‘Input‘ column to ‘Not possible’ value in the ‘Special Attributes’ tab on the columns ‘ERNAM’, ‘ERDAT’, ‘AENAM’ and ‘LAEDA’.


Hope it helps. See you on the next.